Showing posts with label desserts. Show all posts

Saturday, April 1, 2017

Cranberry pecan biscotti

Based on this almond biscotti recipe:
http://www.italian-dessert-recipes.com/almond_biscotti_recipe.html

I consider this relatively healthy because it's only 2/3 cup a sugar spread over 16 slices and contains no butter. I read somewhere that real Italian biscotti should not contain butter; that butter is an American modification. Correct me if I'm wrong. I had XL instead of just large eggs at home, so I substituted a flaxseed egg for the other egg, which adds another healthier substitution without seriously compromising taste or texture. Also, if you use walnuts instead of pecans, you add omega-3 fatty acids to make it even healthier.


Cranberry Pecan Biscotti (makes ~12-16 biscotti)

Ingredients:
1 large egg
just under 2/3 cup sugar
1 Tbs ground flaxseed + 3 Tbs water
1 tsp vanilla
1 1/4 cup unbleached all-purpose flour
1/2 cup whole wheat pastry flour
1 tsp baking powder
1/2 tsp cinnamon
1/4 tsp salt
1/2 cup toasted, chopped pecans (and walnuts, opt)
1/4 cup dried cranberries (make sure they are still dried yet moist, not hard and dry)

Directions:

  1. If pecans are not yet toasted: toast pecans on skillet over medium heat for 8-10 minutes. Let cool then chop.
  2. Mix flaxseed and water in a small bowl and let sit for a 3-5 minutes to thicken.
  3. Mix the all-purpose flour, pastry flour, baking powder, cinnamon, and salt in a large bowl.
  4. Beat egg and sugar till turns lighter in color. Beat in flaxseed water. Beat till light colored and thick.
  5. Fold the wet into the dry ingredients until incorporated.
  6. Fold in the nuts and cranberries.
  7. Preheat oven to 350 deg Fahrenheit. Place a sheet of parchment paper on a cookie sheet or lightly grease the cookie sheet.
  8. Gather the dough (it will be sticky!) and place in a log-shape on the center of the parchment paper. Use a spoon to smooth out the dough into a longer log with even sides. You may use the parchment paper to help shape the log.
  9. Based on the recipe, you can bake a log that is about 12 inches long by 3.5 inches wide for 25 minutes.
  10. Remove and let cool for 8-10 minutes. Reduce oven temperature to 325 deg Fahrenheit.
  11. Slice into about 16 slices. Place slices cut-side down on the cookie sheet and bake for another 10 minutes. Flip over and bake another 10 minutes.
  12. Remove, cool at least 5 minutes and enjoy!
Ideas:
  • Ice with a simple vanilla, milk or lemon icing 
  • Melt dark chocolate chips and dip half of the biscotti or the top side of the biscotti in the dark chocolate and let harden
  • Eat with coffee or milk

Tuesday, March 1, 2016

Tiramisu Cheesecake

Cheesecake is an American favorite, but the New York style and Cheesecake Factory ones are usually too thick and too sweet for me. The American palate tends to turn their desserts into sugar and fat bombs that are quite bad for your health, but are sure addicting! Being health-conscious and familiar with Asian-style sweets, I lean toward less sweet or sweet and salty desserts. I like combining sweets with something slightly salty or savory and bitter, such as adding nuts. Red bean and sesame desserts are delicious to me, too, because the flavors help cut the sweetness of whatever dessert they are in.


I must admit that I do like cheesecake, but in small portions, like the cheesecake bites at Yogurtland. Sometimes, I get that craving but never go out and buy one because most restaurants and stores makes theirs too sweet and thick. Finally, I had time to make one. I found this tiramisu mascarpone by BelGioioso, and I wanted to make tiramisu, because that is one of my top favorite cakes, but that required getting heavy cream and whipping cream and other things. I already had cream cheese at home so I thought a tiramisu cheesecake would be an awesome thing to make.

After searching a bit, I found this recipe for tiramisu cheesecake on AllRecipes that met my requirements for minimal ingredients and only a moderate amount of work and complexity. Earlier, I made a batch of homemade graham crackers and decided to add that to the crust to add a bit more crunch and flavor. I made some other adjustments as I went along: (1) soaked ladyfingers in a mix of Kahlua and coffee and wedged in the cheesecake batter, (2) added more Kahlua to the crust, (3) added more Kahlua and coffee to the cheesecake batter, and (4) topped with a pretty design using finely-ground coffee. I reduced the sugar by half because of my aforementioned aversion to sweet desserts and the cheesecake came out perfectly. It was just sweet enough and just thick enough to be addicting and enjoyable without getting sugar headaches. In addition to those changes, I baked the cheesecake in a waterbath, which helps maintain moisture while baking. I think I read somewhere that the waterbath also helps the top from cracking and helps the cheesecake bake evenly.


My family was very impressed by the presentation and flavor of this cake. This is definitely a recipe that I will return to time and again when I want a show-stopping cake!


Tiramisu Cheesecake with Kahlua
Ingredients
~Crust~
1 7 oz package of ladyfinger cookies, crushed to a coarse powder
About 5 crushed graham crackers to bring up the dry weight to 12 oz (I will increase the amount of crust in the future. This was too thin for my liking)
2 Tbs Kahlua (coffee liqueur)
4 Tbs of unsalted butter, melted

~Filling~
16 oz of cream cheese (regular or Neufchatel)
8 oz of BelGioioso tiramisu mascarpone cheese (mascarpone cheese flavored with real coffee and sugar; you could probably make your own by mixing mascarpone with some instant espresso powder and some sugar, or with a splash of room temperature strong brewed coffee with some sugar)
2 eggs
1/2 cup white sugar
4 Tbs all-purpose flour or white whole wheat flour
3-4 Tbs Kahlua (I would add more Kahlua and coffee in the future)
3-4 Tbs of strong-brewed coffee, cooled to room temperature OR 3-4 Tbs water mixed with 1-2 tsp instant coffee granules
4-6 ladyfinger cookies
Finely ground coffee for decorating top (optional)

Special Equipment
A 9" springform, nonstick pan
A jelly roll pan with at least a 1" rim

Directions
1. Mix the crushed ladyfingers and graham crackers with the Kahlua and butter. Press into the bottom of a 9" springform pan.
2. Beat the cream cheese, mascarpone cheese, and sugar until smooth. Add the Kahlua and coffee and mix. Add the eggs and four and mix slowly, just until incorporated. You do not want to overbeat or else the cheesecake will crack as it cools.
3. Pour half of the cheesecake batter over the crust.
4. Mix the brewed coffee (at room temperature) with some Kahlua. Dip each ladyfinger in the mixture and arrange in a single layer over the cheesecake. You don't need to cover the entire top.
5. Preheat the oven to 350 degrees Fahrenheit.
6. Pour the remaining cheesecake batter over the ladyfingers. Jiggle the pan a bit to distribute the batter evenly.
7. Place the pan on a large sheet of aluminum foil. Wrap the foil up and around the sides of the pan, making sure there is no opening for water to get in. Make a second layer of aluminum foil wrap in the same fashion. Place the wrapped pan in middle of the jelly roll pan. Pour water to reach 1/2" up the side of the pan.
8. Place the pan in the center of the oven and bake for 30-40 minutes - just until the cheesecake is only slightly jiggly in the center. If it is browning on top too quickly, cover the top with foil and lower the temperature 10 degrees. Once done, turn off the oven and leave the cheesecake in the oven with the oven door open for 20 minutes. Then, remove from the oven, let cool to room temperature, then refrigerate at least 3 hours.
9. Before serving, dust finely ground coffee over the top, using patterned stencils if desired. Slice and serve!


Tips:
1. Wipe your knife with water in between slices to prevent dragging cheese filling over the rest of the cake.
2. Cheesecake freezes and thaws well too. You can wrap individual slices, or put wax or parchment paper in between slices, then wrap and freeze. When you want to eat, just remove from the freezer, thaw, and eat!
3. You can sprinkle cocoa powder on top instead of finely-ground coffee.

Friday, January 2, 2015

Pear pecan pie

One thing that I've started baking and has never failed me is an apple pecan pie. I like apple pie but it can be a little boring just eating apples in buttery crust. I like the top part of the pecan pie but don't like the usual thick layer of corn syrup filling beneath. To make a healthier, more dynamic and delicious pie, I thought about combining the two! The first time I made it, I loosely based it on this recipe and used a pre-made pie crust. It came out so well, I was surprised! Using pre-made crusts makes pie-making a breeze!

For Thanksgiving this year, I made it again, but did not have enough apples to fill my 9.5" pie pan! So I had to add this pecan oat crumble and maple whipped cream.


For Christmas, my mom bought a lot of pears so I made my signature apple pecan pie but with the pears! Used bartlett pears that are still slightly crisp, not too ripe or soft, instead of apples. For the pear pecan pie, I used a few different recipes for reference but here's the basic gist:

Pear Pecan Pie
Ingredients
1 refrigerated roll of pie crust for 9" pie, unbaked
Filling:
3 medium/large bartlett pears, peeled and cored, then cut into thin slices
1/3 cup light brown sugar (not packed)
1/3 cup flour
1/2 tsp cinnamon
1/4 tsp cloves
1/4 tsp nutmeg
1/4 to 1/3 extra juicy lime or lemon

Streusal Topping:
1/3 cup pecans, chopped
2-3 Tbs butter, softened
1/4 cup flour
1/3 cup light  brown sugar (not packed)
1/2 tsp cinnamon

Directions:
  1. Combine pears with juice of the lime, cinnamon, cloves, nutmeg, light brown sugar, and flour.
  2. Line a 9" pie pan with the pie crust. Crimp crust. Prick crust a few times with a fork and bake in an oven at 350 deg Fahrenheit for 8 minutes.
  3. Remove from oven and let cool while you prepare the streusal topping: Combine all the ingredients for the streusal topping in a medium bowl using your hands, forks, or whatever you need to make it a uniform crumble.
  4. Fill the baked pie crust with the pear filling. You may align the pear slices in a pretty circle.
  5. Top the pie with the streusal. 
  6. Cover the crust of the pie with aluminum foil or a pie crust shield
  7. Bake about 40-45 minutes until just browned on top of the pie. 
  8. Let cool. Slice and serve with fresh whipped cream.

Saturday, May 4, 2013

Vanilla Souffles

 
Souffle. 

You hear the word and the image of a delicate dessert set in a cute French bakery on a light Spring day crosses your mind. After the pleasant image plays to the end of its reel, another takes it place. Cartoon characters rush into a kitchen just as you pull the souffle from the oven, excited to see its risen cylindrical golden top.

Boom! Clatter!

The characters crash into pots and pans and yell in surprise.

The souffle exhales a big fat POOT! and crumples into itself. The expression on your face is that of priceless horror and sadness.

Oh, souffle, oh souffle.

You put the ramekins down and chase those cartoon characters into the horizon as cartoon-y music plays in the background. Th-th-th-that's all folks!

...

Is that what you imagine when you hear about souffles and thinking about making them? There may be a misconception that souffles are hard to make and that they deflate if there is a large sound. Quite the contrary. Souffles are very simple to make and the deflation is a matter of time not audio agitation. Because souffles deflate so quickly, they must be served right away and I think this contributes to its perception as a difficult dessert to make. It is only difficult because it must be made and served at the right time.

As an aspiring baker, I believe you have to make a souffle at least once. It's like a requirement to call yourself a baker. Muffins, brownies, cookies. Yeah, yeah, we can all make those. But when I imagine a true European baker, I imagine the careful creation of decorated cakes, tartlets, croissants, and souffles. My goals to becoming a better baker include making these items at least once in my life, and eventually coming back to perfect them.

You have already seen the labor-intensive devil's food chocolate cake that I made for my sister's graduation. (which I realize I never posted about. Whoops. Typical me. And I can't find all my photos from my sister's graduation...there were so many good pictures T_T ... That cake was so awesome and I put so much work into it)


I made a healthy fruit tart that was tasty enough but could use some work with the crust.


And I made whole wheat croissants before that took so much butter and so much rolling. The whole wheat croissants were tasty (despite a little more time spent in the oven than I had wanted) but it is definitely something you have to have a lot of free time and energy for. (Again, I cannot find the pictures. And I totally thought I had posted about them or at least the pictures before, but I went through all my posts and see nothing! Oh sadness)

My grandma would agree; she recently made croissants too and said she would probably not try and make them again. Costco croissants are fine and dandy, thank you very much.


I decided to make a classic vanilla souffle. My decision was prompted by this new YouTube baker I randomly found one day. Eugenie Kitchen is such a pristine cooking blog and series of cooking videos. Eugenie is this adorable Korean lady who talks eloquently, speaks French, and teaches each recipe through straightforward, well-explained steps. She even has every ingredient placed in such cute bowls and plates. I watched her video for vanilla souffle and was impressed by how easy it seemed. When I came home for winter break, I was excited to try it because my sister bought ramekins (she had bought them to make creme brulee, but I don't think that has happened yet).


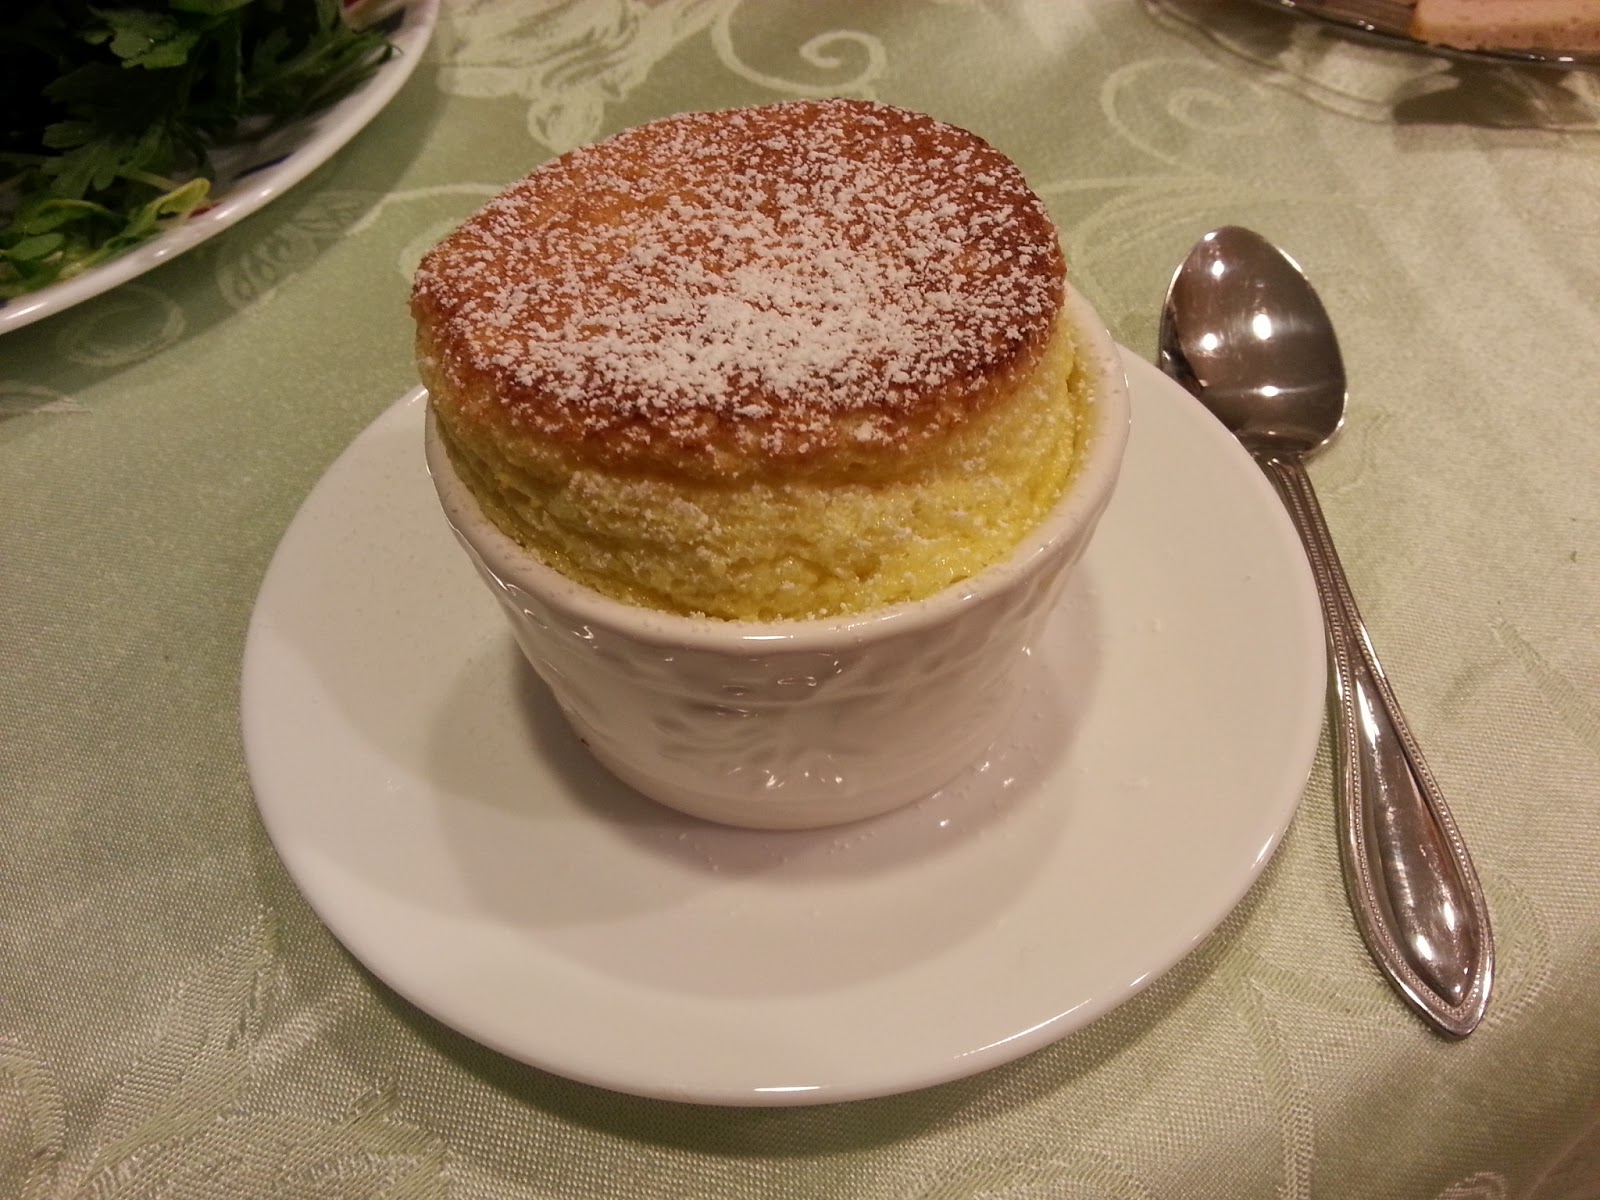
  I followed her recipe to the dot and my 4 ramekins full of souffle came out so perfect and amazing! With a light dusting of powdered sugar, they were the perfect degree of sweetness. It was like an eggy, airy pancake. It was still warm inside. You pierce the top with a spoon and then it sinks through the moist spongy interior. You put it in your mouth and the flavor of vanilla and custard hits your tastebuds while the warmth enhances the experiences.


Souffles are such an awesome dessert. I would like to make them more often, but it is sad they only last around 10 minutes. They start deflating around 5 minutes, so you really have to eat them fast. Even after deflating, they are still edible and still have the same flavor, just not all of the awesome flavor of fresh.


I would highly recommend trying out this recipe at least once in your baking career. It is little effort with big reward.

For the recipe, hop on over to Eugenie Kitchen!

Friday, January 18, 2013

Catching Up

Wow, that last post was really depressing. But I had to put it up. Other bloggers have to see that other bloggers have real-life problems too and it's not all just pretty food pictures and baking heaven. Also, I needed to get a load off my chest. Since then, things have been going much better. I feel more confident, but that is also because some things in lab are working now. It's a slow process, but it's something I have to learn and persevere through. I understand that graduate school and research is not easy, but the difficulties seem to overwhelm me at times. I will learn to handle stress and anxiety better, but it will take time. First, I have to get a hold on my emotions and allow my self-perception to change. I think I am happier and mentally healthier now. :-)

Now, to food-related things!

As usual, I have been cooking lots and taking pictures of food lots, but being too lazy to pull out my computer and type up something entertaining about it. I will create individual posts for each of these with recipes next time. Until then, enjoy these quick bites of my last semester!

Cinnamon (raisin) rolls (with yeast!) - Sept 9, 2012


I once made cinnamon rolls before, but those didn't rise well and were overbaked. This time around, I tried the recipe at Two Peas and a Pod. I switched out half of the all-purpose flour for white whole wheat flour. I also added apple juice-soaked raisins to half of the dough.


These were better texture-wise, but my addition of whole wheat flour and minimal cinnamon-sugar-butter filling made it not as decadent as I hoped. It rose better than my very first batch, but was still not as fluffy as I wanted. Nevertheless, it was tasty and would serve as a good breakfast without the sugar-rush and super-unhealthiness of Cinnabon and the like.


I iced them with a lemon vanilla frosting, simply made from fresh lemon juice, vanilla extract, and powdered sugar.

Homemade Spring Rolls (Goi Cuon) - Sept 26, 2012


Rice paper is soaked in water briefly to soften, then wrapped around fresh Vietnamese herbs, roasted shredded chicken, surimi (imitation crabmeat), and fresh roasted peanuts, and served with peanut sauce. Typical Vietnamese herbs wrapped inside include Vietnamese mint, Vietnamese coriander, fish mint, chives, and lettuce. Homemade, pan-roasted peanuts are a must. The flavor of freshly roasted peanuts surpasses that of storebought.

Honey Buttermilk Cornbread - Sept 21, 2012


 I have been trying to perfect my cornbread recipe. This one comes pretty close, but I can never achieve the pure heaven that is Smart Alec's cornbread (in Berkeley). Theirs is a huge golden square served up with their salads or soups. The top is slightly sticky and the texture is slightly crumbly but still maintains shape. It is sweet and moist, not dry like cornbread mixes. I have not replicated that but I found a recipe that really delighted me. The use of buttermilk is a must for achieving a really creamy and more flavorful cornbread.
 

I sprinkled the top with my organic cane sugar. This sugar is less refined and therefore composed of larger crystals than regular granulated sugar. It adds a slight sweet crunch to the top.


I really like this recipe but believe it still needs some adjustment before it can be anywhere close to Smart Alec's. Next time, I may add more honey to increase the moistness and sweetness more.


Raisin Oat Scones- Sept 29, 2012


I love scones. Not the crazy sweet ones you get from grocery stores or chain coffee stores. I like homemade or artisan bakery scones, where the emphasis is on the good butter or cream and the simple combination of flavors. I love to see oats or seeds top my scones instead of icing. I believe, as a breakfast food, it need not have icing.


These are healthy scones made with oats, whole wheat flour, flaxseed, and raisins. Coming straight from the oven, they are warm and tasty and delicious. A couple days later, they get dry, but that's why they are wonderful accompanied by tea!


I made about 8 wedges, which came out very large. They are satisfying, wholesome, and sweet enough, especially great with some vanilla almond milk.


Mushroom Mataar - Oct 7, 2012

In College Station, there is only one Indian restaurant (although I've heard about many Indian mini-marts inside gas stations and convenience stores). Coming from Berkeley, and even Southern California, I had many options for Indian food (although, sadly, I did not indulge in enough while I was there). Every now and then I get a craving for Indian food. Tikka masala, samosas, korma, jalfrezi, curry, mango lassi...

I also really like peas, and Indians know how to make peas taste awesome. I looked online for an Indian pea recipe, and I had mushrooms on hand. I came across this recipe and made this!


The flavors were good. There was a warm complexity, thanks to the melding of the mushroom umami and the spices. I served it on whole wheat couscous, which is what I had on hand, but it would be much better with naan or rice (brown or basmati). Whole wheat couscous has such a strong flavor that I would not recommend eating it with anything really. Sorry, Bob's Red Mill, even your awesome brand cannot make whole wheat couscous better. It tastes like play-doh to me...bleh.


Anyways, I really liked this. Probably not authentic and lacks some degrees of flavor depth key to Indian food, but tasty enough for me.

Gingerbread Donuts - Dec. 13, 2012


I finally remembered to buy molasses, so to celebrate its induction into my household, I made gingerbread donuts. They were very tasty. I was really pleased with this batch of donuts. I often have trouble pulling the donuts out of the mini donut pan, even after greasing it up. These came out so beautifully, without breaking the top halves! I was ecstatic!


I iced these with a lime cream cheese frosting (lime+vanilla+powdered sugar+cream cheese). Lemon typically goes with ginger pastries, but I had bought too many key limes and needed to use them. The flavors actually went well together. One of my favorite donuts yet!

 ---

I have more, but I don't want to unveil everything now, lest I blow all my secrets! Or, in other words, it's late and I don't want to type anymore. You can see my other adventures...probably not soon. When I feel like posting again. Ok, toodles!

Friday, March 16, 2012

Because I'm Lazy: Food Slideshow

Hiiii. I am avoiding doing homework and studying but being productive in other creative ways by posting up the food things I've been exploring these past couple of months. Again, it's been a few months since I last posted, and since then I've baked and cooked and eaten quite a lot. Below is a collection of goods that I've made. Recipes may follow...

One day.

:-P

To prevent overloading of this page with photos, I'll do them in series.

The first part of the series will be what I did over winter break, after the donuts that I wrote about in the last post.

Pumpkin Chocolate Chip Cookies (repeat)


These never last long...

Fruit Tart (wheat+walnut crust, pastry cream, fresh fruit, apricot glaze)

Homemade pastry cream: egg yolks, almond milk, sugar, vanilla

Drizzled with Dove dark chocolate ganache

Pandan Mini Baked Donuts
Light cakes, perfect without icing, probably enhanced with coconut frosting
 Mango Peach Jam Cake
From my Diabetic Cooking Cookbook, my favorite cookbook even though I'm not diabetic!

Organic mango peach jam layers the middle

Healthy, perfect breakfast or snack cake, and uses flaxmeal for egg

That's what I'll tease you all with for now. Lots more to come, including full-fledged meals with meat! Look, ma, I cooked!

--------
LIFE, Now
-------
By the way, it's been pouring nonstop here in Berkeley. Man! It's crazy weather!!! There may be a couple minutes here and there where it stops, but then it starts up again like a shower in the sky. Poor E-Week events were dampened (pardon the pun) by the rain. No ultimate frisbee competition, but the carnival is still going on in Hearst Mining, which looked so fun. Too bad I have work (right now, poo) and can't go to it.

Wow, 2 more months and then I graduate!!! I've already selected to go to Texas A&M, College Station, to do my PhD in Biomedical Engineering, starting Fall 2012. So excited! I'm already planning how I'm getting groceries, where I'm living, places I want to eat and try, and dreaming of opening and managing a Trader Joe's while I'm doing my 5-6 year PhD there. Haha, crazy weather makes a crazy mind. Change is about, my friends, and the future shall bring to us its mysteries!!!

Monday, January 23, 2012

Boston Cream Mini Pies and Mini Donuts

Really quickly:

CHUC MUNG NAM MOI!!
HAPPY LUNAR NEW YEAR!!!!

(I'll have to talk about my New Year soon, nothing big, since I'm back in Berkeley and my family got to go to temple and family Te^t dinner's back home in SoCal)...
*
**
Onto the post
**
*

Resources are a big issue for me. When it comes to baking and cooking, I like to scrape out the last bits and pieces of every thing I use. You can just get a tad bit more with all that wonderful batter clinging to the sides of your mixing bowl. That's why spatulas are so amazing. Another thing about baking is how some recipes call for just egg yolks or just egg whites. That bothers me a lot; like, what am I going to do with the rest of the egg after this recipe!!! I don't want to bake so soon, and especially with just egg yolks. But the situation came about after making two pies over winter break (one sapote and one pumpkin, to be posted about later). I had 4 egg yolks leftover (the pie filling used 1 whole egg and 1 egg white). Contemplating my options, I juggled the idea of making Boston cream pies (2-layer cakes filled with pastry cream and covered in chocolate ganache, which I've always wanted to try and taste) or maybe cream puffs. I ended up deciding to make a double batch of mini donuts, but with a twist.
Heavenly?

I would make Boston Cream Mini Pies and Mini Donuts!

My idea was just to overfill the mini donut pan so it would create something like a bundt with a base at the bottom and a cavity in the center. This happened the first time I ever baked VeganYumYum's donuts, because I filled the pan about 2/3 full, causing the donuts to rise up more than they were supposed, and closing over the center. With this idea, I would fill the cavity with pastry cream and cover the whole thing in chocolate ganache.


Filled with pastry cream, awaiting a topping of chocolate P:
So I baked the donuts. I guess I didn't fill 'em up high enough, so all the donuts didn't completely get that covered cavity. I made amends partway into baking by layering a small dallop of batter on top of the central support of each donut. This created a rather lopsided rounded thing in center of the base, which I pushed down to try and make flatter to be able to stand. It turned out all right, still able to carry the loud in the center.

Boston Cream Mini Pies
Surprisingly, making pastry cream is really easy. All that is required is too simmer the eggs, milk, a bit of sugar, and (vanilla) flavoring over the stove, whisking constantly. Then you cool it to room temperature, covered, and then refrigerate. 4 eggs made quite a lot, enough for me to fill an innumerable number of mini cakes and to make a fruit tart later. I based the recipe for pastry cream off of JoyofBaking, but I used 4 egg yolks, used almond milk (OMG, best milk ever), and vanilla extract and did not put in any liqueur. I folded in a couple spoonfuls of CoolWhip topping to make it lighter, which produced the whiter color and fluffier texture.

Pastry cream is a quick and simple technique anyone can learn, and is a great way to use those leftover eggs. I really recommend every aspiring baker try it at least once.

Okay, back to the mini boston cream pies. So, since the first batch of donuts had uneven bottoms, I decided to use the rest of the batter to make mini cupcakes. I cored the center of each mini cupcake, filled it with pastry cream and slathered a beautiful layer of chocolate ganache. I liked the mini cupcakes better in terms of ease and evenness, but the mini donuts version are really awesome, especially when you can see the pastry cream and cake beneath stripes of ganache.

Cross-section. Gorgeous, no?

I also used a bit of the batter to make some regular mini donuts that I topped with the ganache as well.

Three mini donuts for my friend Sam :)
The recipe for the cake base can be found here. For the chocolate ganache (based from here), I melted about 5 oz of semisweet chocolate chips and stirred in about 1/2 cup heavy whipping cream.

Boston Cream Mini Pies and Mini Donuts
Cake
See here (double the recipe). You can bake in either a mini donut pan or a mini muffin pan. If doing in a mini donut pan, overfill the cups or place some batter over the central protrusion of each cup partway through baking.

Pastry Cream
See here. (You will have leftover pastry cream)

Chocolate Ganache
Microwave 5 oz semisweet chocolate chips (can use some dark chocolate) for about 10 seconds. Stir. Repeat until nicely melted but not overheated. Stir in 1/2 cup room temperature heavy whipping cream. Whisk until smooth. You can let cool a bit more to a consistency you like. Cover and refrigerate leftovers. Microwave briefly to make viscous again. (You will have leftovers! Wonderful for dipping with fresh fruit!)

Assembly
1.  Place your mini donuts and cupcakes on a wire rack with a cookie sheet beneath.
2. Core the center out of each mini cupcake (you don't need the tops, so eat them! You know, as a taste test of course! ;-P ).

Coring the mini cupcakes
3. Fill center of each donut (upside down) or mini cupcake with pastry cream just to the top.


4. Put a generous dollop of chocolate ganache on the top of the mini cupcakes and spread with a knife around. For the mini donuts, a striped drizzle is best, accomplished by dipping a knife into the ganache and then slowly weaving across the top of the donut.


5. Let the chocolate ganache set. Serve!

*Note, the chocolate ganache can still stick to things, so when you set these up on plates and serving trays, try to separate them with enough room between pieces and for people to get their fingers in and grab one.

Saucer of goodness!
Enjoy!!!